How to Put a Drupal 7 Site Into Read Only Mode for Non Administrator Users
Network: Establishing Windows File and Folder Level Permissions
Last updated
In many cases, you lot will need to change the permissions that a certain group or individual user has to a file or folder. For example, you can designate a special folder on the Due west: drive inside your department's area called "Incoming" as a place where students can turn in their work. To do this, you would start need to create a new folder on the W: bulldoze. By default, the new folder will have the same permissions as the parent folder, which would not allow students to submit their work, and may non allow students to even access the binder. You would so need to allow students access to the new folder, and set up permissions for the folder. When y'all set permissions, you are specifying what level of access students take to the folder and its files and what students tin can do inside that folder such every bit save, delete, or read files.
NOTE: The majority of these instructions refer to Computer in the Starting time Menu.
Content
- Standard Permission Types
- Create a New Binder
- Accessing the Properties Dialog Box
- Granting Access to a File or Folder
- Setting Permissions
- Advanced Folder Level Permissions
Standard Permission Types
There are six standard permission types which employ to files and folders in Windows:
- Total Control
- Alter
- Read & Execute
- List Binder Contents
- Read
- Write
Each level represents a different set of actions users can perform. See the table below for more information.
For folders you tin can also set your own unique permissions or create a variation on any of the standard permission levels. Inside each of the permission levels are many possible variations. For information on some of these advanced options, refer to Advanced Folder Level Permissions below.
The post-obit tabular array represents the available standard permission types.
| Permission | Description |
|---|---|
| Full Control | Permits the user(s) to:
|
| Change | Permits the user(southward) to:
|
| Read & Execute | Permits the user(s) to:
|
| List Folder Contents | Permits the user(s) to:
|
| Read | Permits the user(s) to:
|
| Write | The Read permissions, plus permits the user(s) to:
|
Create a New Folder
In many cases you will need to create a new folder. If you are using an existing folder and do not wish to create a new binder, continue with Accessing the Properties Dialog Box.
- Click on the Start carte.
- Click Computer.
- From the Computer window, select the shared drive for your area or department (S Bulldoze or W Drive).
- Navigate to the location you want the new binder to appear (e.g., within 1 of your existing folders).
- On the carte bar, select New Folder.
OR
Right click » select New » select Binder.
A new folder is created which inherits the security permissions of its "parent."
- In the newly created binder, type the desired binder name.
- Press [Enter] or click off of the folder.
Accessing the Properties Dialog Box
When working with permissions in Windows 7, you are required to work from the Properties dialog box. This dialog box for the file or folder you are working with tin can exist accessed in a few steps.
- Click on the Start menu.
- Click Computer.
- Select the folder or file you lot wish to accommodate/view permissions for.
- Right-click the folder or file.
- Select Properties .
The Properties dialog box appears.
Granting Access to a File or Folder
Subsequently creating a new folder, or even if you will use an existing folder, you will need to decide who will have admission to it. As well, keep in listen that by default the same persons who take access to the "parent" (original) folder also have access to the new folder, and vice versa. This may non be platonic. It is a simple process to grant access to specific users for whatsoever binder you have created.
- Access the Backdrop dialog box.
- Select the Security tab.
- Click Edit.
The security tab opens in a new window.
- Click Add together...
The Select Users, Computers, or Groups dialog box appears.
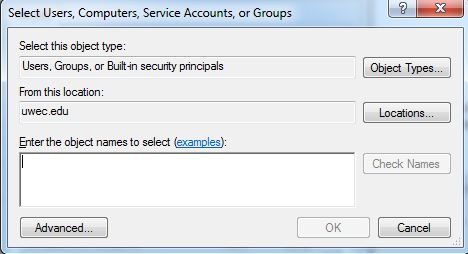
- In the Enter the object names to select text box, type the name of the user or group that will have access to the binder (e.m., 2125.engl.498.001 or username@uwec.edu).
HINT: You lot may blazon the beginning of the proper name and then click Bank check Names. The proper name will either exist resolved or a list of users beginning with those characters volition brandish for you to select from.
- Click OK.
The Backdrop dialog box reappears.
- Click OK on the Security window.
- Go along with Setting Permissions below.
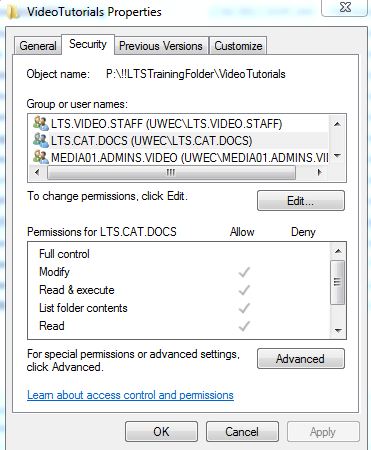
Setting Permissions
In one case you have granted a grouping or individual user access to a folder, you volition demand to set permissions for the new user(s). When yous set permissions, you are specifying what level of access a user(south) has to the folder and the files within it. Be careful well-nigh checking Deny for whatever permissions, equally the Deny permission overrides any other related to Allow permissions.
Folder permissions can be changed only by the owner of the binder (i.e., the creator) or by someone who has been granted permission past the owner. If you are non the owner of the binder or have not been granted permission by the owner, all checkboxes will be gray. Therefore, you will non be able to make whatever changes until the owner grants you permission.
- Access the Properties dialog box.
- Select the Security tab.
The superlative portion of the dialog box lists the users and/or groups that have access to the file or folder.
- Click Edit

- In the Group or user name section, select the user(s) you wish to set permissions for
- In the Permissions section, use the checkboxes to select the appropriate permission level
- Click Apply
- Click Okay
The new permissions are added to the file or folder.
Advanced Binder Level Permissions
When you set permissions, you specify what users are allowed to do within that folder, such every bit salve and delete files or create a new folder. You are not express to choosing one of the standard permissions settings (Full Control, Change, Read & Execute, List Folder Contents, Read, or Write). Instead of choosing one of these settings, you may fix your ain unique permissions based on what you would similar users to be able to exercise. For an understanding of how options can exist combined, refer to Permission Types: An Overview.
Recall, binder permissions can but be inverse by the owner of the binder (i.east., the creator) or by someone who has been granted permission by the possessor. If y'all are not the possessor of the folder or have non been granted permission past the owner, the checkboxes will exist grayed out. Therefore, you will non exist able to make whatsoever changes until the possessor grants you permission.
- Access the Properties dialog box
- Select the Security tab
- Near the bottom right of the Properties dialog box, click Advanced
The Advanced Security Settings dialog box appears.

- (Optional) If you do not desire the new folder to have the same permissions every bit the "parent" (original) folder and wish to gear up unique permissions for the new folder, click the Change Permission push button virtually the bottom. This will bring upwards a similar window.
- Uncheck the Include inheritable permissions from this object'due south parent checkbox
A Windows Security alert dialog box will appear.
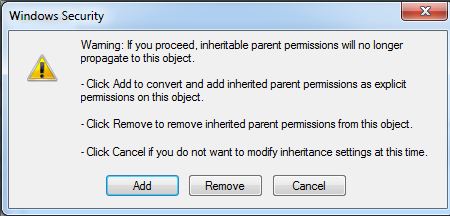
- Click Remove if yous want someone removed from permission all together
NOTE: Read the instructions carefully and choose the action you wish to have taken for permissions.
- Uncheck the Include inheritable permissions from this object'due south parent checkbox
- Click the Change Permissions button
- Select the appropriate user
OR
Click Add and enter the proper noun of the user or group that will have access to the folder.
- Click Edit...
The Permissions Entry dialog box appears.
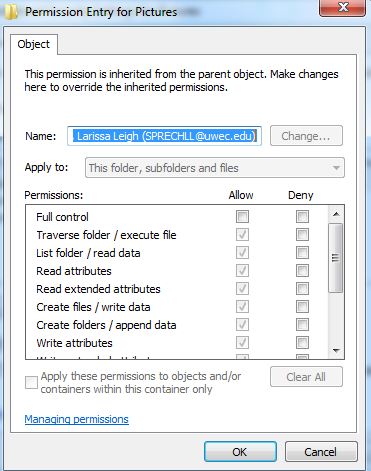
- In the Permissions section, use the checkboxes to fix the appropriate permissions
NOTE: If you are not the possessor of the binder or have not been granted permission by the owner, all checkboxes will be gray. Therefore you will not exist able to make whatever changes until the owner grants you permission to do and then.
- From the Apply to: pull-down list, select what level you lot wish to apply these permissions to
- Click OK
- In the Avant-garde Security Setting dialog box, click OK
- Click OK from the duplicate Avant-garde Security Settings
- In the Backdrop dialog box, click OK
The new folder permissions are added for your specified user(south).
Source: https://www.uwec.edu/kb/article/drives-establishing-windows-file-and-folder-level-permissions/